
This topic describes how to set up for vendor ACH payments and explains the workflows of automatic versus manual ACH file creation.
Sign in to Beyond client as a system administrator.
Select Financials | Setup | Payables Policies.
In the ACH Settings area, select from these options:
Allow Automatic ACH File Creation at Payment Selection – If you want the system to automatically create the ACH file when selecting which documents to pay in Financials | Payables | Payment Selection, select this option.
Require Separate User to Approve ACH Vendor Setup – To require a separate user to approve an ACH vendor setup, leave Require Separate User to Approve ACH Vendor Setup selected. If this option is cleared, the person entering/updating the vendor ACH settings will be considered both the updater and approver. However, unlike for a separate approver, the Approve ACH Settings button will not be visible on the ACH Settings dialog that is used for specifying a vendor's ACH bank routing/account information. The updater/approver only needs to click OK on that dialog for the settings to be approved.
Security Note: We strongly recommend that you have separate users for ACH update and approval.
Select Administration | Roles.
Create new roles for users who will have update and approval ACH permissions. For example, you could create these roles:
Note: You can use existing roles for the ACH permissions.
Open the ACH approver role and, on the Other tab, select Approve Vendor ACH Payment Settings.
On the Screens tab, give permissions for these screens:
Vendors, under Financials | Payables
ACH Payments, under Financials | Payables
ACH Payment Log Console, under Financials | Consoles.
On the Users tab, select the user(s) for this role.
Click Save and then close the Role dialog.
Back on the Roles screen, open the ACH updater role and on the Other tab, select Update Vendor ACH Payment Settings.
On the Screens tab, give permissions for these screens:
Vendors, under Financials | Payables
ACH Payments, under Financials | Payables
ACH Payment Log Console, under Financials | Consoles
On the Users tab, select the user(s) for this role.
Click Save and then close the Role dialog.
Back on the Roles screen, open the System Administrator role and, on the Other tab, ensure that Approve Vendor ACH Payment Settings and Update Vendor ACH Payment Settings are NOT selected. If those permissions are selected, clear them and then click Save.
Close the Role dialog and the Roles screen.
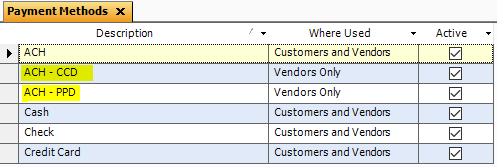
Select Financials | Setup | Payment Methods.
Verify that the ACH - CCD and ACH - PPD payment methods are available and active for VENDORS ONLY. See also Payment Methods.
Note: You may rename existing payment methods, however, you cannot add new lines for ACH payment methods. The system will always look at the row IDs for the values shown here:
Select Financials | Setup | Bank Accounts.
Verify that a bank account is set up for vendor ACH payments. ACH settings much be specified on the Other Settings tab for the account. See also Bank Accounts.
Sign out the system administrator.
Sign in the ACH update user.
Select Financials | Payables | Vendors.
Open a vendor record that you want to have ACH payments.
In the Payments section, set Payment Method to ACH - CCD or ACH - PPD, as appropriate for the selected vendor. The ACH Settings button is enabled.
Note: The button is enabled only after you select an ACH payment method and if the signed in user has permissions to update or approve vendor ACH payment settings.
Click ACH Settings and, in the ACH Settings dialog, specify the required information. See Vendor.
Click OK. A notification is displayed regarding approval of the vendor's ACH settings. Click OK on this notification.
Click Save for the vendor updates and sign out.
Sign in the ACH approver.
Select Financials | Payables | Vendors.
Open the vendor record to approve ACH settings.
In the Payments section, click ACH Settings.
In the ACH Settings dialog, click Approve ACH Settings.
Click Save for the vendor updates and sign out.
When the Allow Automatic ACH File Creation at Payment Selection check box is selected in Payables Policies and the Payment Selection batch is set to a status of Posted and saved, the ACH file creation process that is also “kicked off” from the ACH Payments screen will also be kicked-off at the end of the process that posts the payment selection batch. After the ACH file creation process has completed, the user will be able to go to the ACH Payments screen and use Find on the main toolbar to look up the ACH payment batch and access its attached ACH file.
Select Financials | Payables | Vendor Invoices and Adjustments.
Create and post a document for a vendor with approved ACH settings.
Select Financials | Payables | Payment Selection.
Specify the required information, select the Automatically Create ACH File check box, and then click Update List.
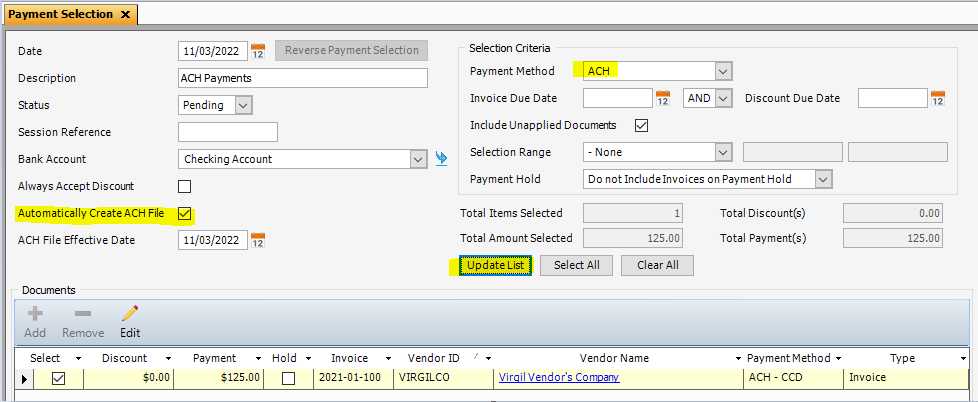
Select the desired document(s) in the grid, set the Status to Posted and then click Save. You are prompted to confirm the process of generating the ACH file. To continue, click Yes. If Send Remittance Notification Emails was selected for the vendor, a confirmation email is sent.
When the process is complete, click OK on the confirmation dialog.
Select Financials | Payables | ACH Payments.
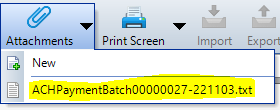
On the toolbar, click Find ![]() and then select the ACH file that was just created.
and then select the ACH file that was just created.
On the toolbar, click the down arrow for Attachments and then select the batch file.
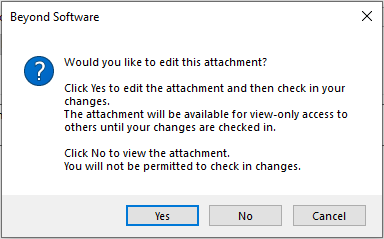
You can view or edit the file.
Note: You can also open the file in Document Management.
Transmit the file using your normal process.
Select Financials | Payables | Vendor Invoices and Adjustments.
Create and post a document for a vendor with approved ACH settings.
Select Financials | Payables | Payment Selection.
Specify the required information. In this case, do not select the Automatically Create ACH File check box. Click Update List.
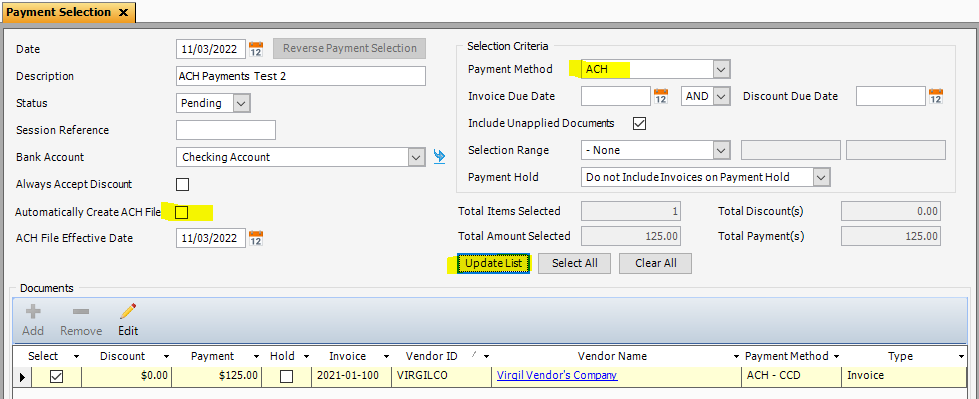
Select the desired document(s) in the grid, set the Status to Posted, and then click Save.
Select Financials | Payables | ACH Payments.
Specify the required information and then click Update List. See ACH Payments.
Select the desired payments in the grid and then click Save.
In the toolbar, click Run Process.
When prompted to confirm, click Yes. After file generation is complete, click OK.
The record status is changed to Posted and an attachment file is created. If Send Remittance Notification Emails was selected for the vendor, a confirmation email is sent.
You can select the attachment file, to view or edit.
You can also open the file in Document Management.
Transmit the file using your normal process.