This topic explains how to create, validate, import, and review a Beyond Client journal entry batch.
Create an import template file. This is an Excel spreadsheet file with the exact data format that must be used for your batch entries.
Action - Select Template.
File - Specify a location and name for your import file. You can accept the default location and file name or click Lookup ![]() to specify something different.
to specify something different.
Open the import template file in Excel and manually add your journal entries. Follow these guidelines:
Do not edit or delete any columns from the file. All columns must exist for the import to work correctly, even if no data is entered into one or more of them.
Recurring journal entries cannot be imported.
In DocNbr, specify a document number. This number must be specified in every row that you add to the file. The following message is displayed if any row is missing the document number:

Note: Keep track of the numbers you use for batch import files because each batch must use a unique number.
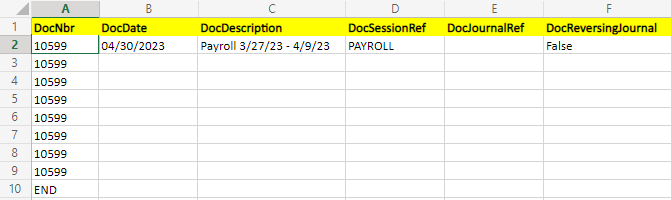
Add header information only once, in the first row of the file. Specify this information:
DocDate - Specify the date for this batch journal entry. Use this date format: mm/dd/yyyy.
DocDescription - Specify a description of up to 250 characters for the entry.
DocSessionRef - Optionally, specify a session reference of up to 10 characters for this entry.
DocJournalRef - Optionally, specify a journal reference of up to 10 characters for this entry.
DocReversingJournal - If the journal entry is to be reversed, specify True. Otherwise, leave the cell empty or specify False. Any other value in this cell will result in this validation error:

This is an example of the header information row in an import file:
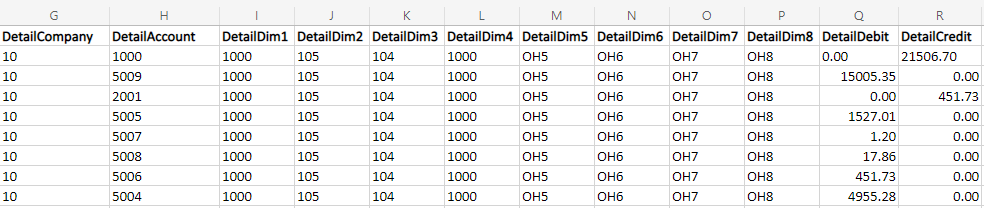
Add journal entry detail information. The first row of detail information should be added in the same row as the header information, as shown in the example at the end of this section. Specify this information:
DetailCompany - Specify the company number for the transaction. If the company is not valid, this message is displayed when you attempt to validate/import the file:

DetailAccount - Specify the account number for the transaction. If the account is not valid, this message is displayed:

DetailDim1 - DetailDim8 - Specify the GL account dimensions in your account group structure. If any one of your dimension entries is not valid, this message (with the applicable dimension number) is displayed:

DetailDebit/DetailCredit - Specify the amount of this detail line in DetailDebit or DetailCredit. If there is no debit amount, specify 0.00 in the debit cell, or if there is no credit amount, specify 0.00 in the credit cell. If one of the cells is left empty, this message is displayed:

Also, if the sum of debits is not equal to the sum of credits specified in the journal entry batch, this message is displayed:

DetailDescription - Specify a description of up to 1000 characters for the detail line.
DetailPaymentMethod - Optionally, specify the payment method for this detail line. If the method given is not valid, this message is displayed:

DetailPaymentRef - Optionally, specify the reference number for the payment, up to 80 characters. For example, if the payment method is Check, the payment reference would be the check number.
DetailProject - If an account that requires project data is used for this transaction, specify the project ID. If the project is not valid, this message is displayed:

DetailTask - If a project that requires task data is used for this transaction, specify the task. If the task is not valid, this message is displayed:

DetailResource - Optionally, specify the ID of the resource with which the transaction is associated. If the resource is not valid, this message is displayed:

DetailResourceFirstName - Optionally, specify the first name of the resource that is associated with the resource ID. If the first name is not valid, this message is displayed.

DetailResourceLastName - Optionally, specify the last name of the resource that is associated with the resource ID. If the last name is not valid, this message is displayed.

Note: Resource information is not required. Also, if you provide a resource ID, then first name and last name are not required. And if you provide a resource first name and last name, then resource ID is not required.
DetailLaborCategory - Optionally, specify the labor category that is associated with this transaction. If the labor category is not valid, this message is displayed:

DetailQuantity - Specify the amount of the transaction. This cell requires a numeric value; otherwise, this message is displayed:

This is an example of detail information in an import file:
END must exist as the last line in the file under column A.
You can add tabs (also called sheets) to the import file, for example, to add multiple batches of entries for import. One tab at a time is specified during validation/import. Each tab must include the exact same data format.
Import the journal entry batch file.
Action - Select Import.
File - Locate and select the import file with your batch entries. Click Open.
Validate Only - To validate the contents of the file against your database but not import the entries yet, select this check box. To validate the file and then import its contents into your database in one step, leave the check box cleared.
Note: With the check box cleared, you can also change Import Status (below) to Posted to have the entries posted.
Import Tab Name - To import entries from a specific tab in your import file, select the tab name in this field. If your file has only one tab, it is specified by default.
Import Status - When Validate Only is cleared, you can select Posted in this field so that entries are validated, imported, and posted in one step.
Use Import Document Numbers - To use the DocNbr assigned in the import file for this journal entry, select this check box. Otherwise, a number will be assigned by the system.
Follow these steps to review a batch journal entry:
Open the Journal Entry screen.
In the toolbar, click Find ![]() . The Journal Entry Find console is displayed.
. The Journal Entry Find console is displayed.
In the Module filter, specify General Ledger.
In Status, specify Pending or Posted, depending on the state of the batch entry that you want to review.
In Date, specify the batch DocDate.
Click Execute ![]() . Your batch entry is displayed. Double-click it to see your detail entries in the Journal Entry screen.
. Your batch entry is displayed. Double-click it to see your detail entries in the Journal Entry screen.