Use Consoles to review the information in your database from unique perspectives. Most of the boxes that are available in the original screen appear as a column default in the respective console. For example, the boxes that you see in Project are available as columns in Project Console.
In all consoles, you can hide and unhide columns to customize what you see in your view. You can group, sort, filter, and zoom in on what you are analyzing.
You can also use the console’s search features. Consoles offer several ways to search:
Run a saved search filter, which is a predefined set of instructions specifying the data types (ID, status, % complete), operators, and values that you want the console to use to find and list records.
Complete a standard search by selecting operators and specifying values in the console filter row.
Complete advanced searches by using the console’s Advanced area. In the Advanced area, you can specify multiple filter criteria, use the features of grouping, and use Boolean operators such as AND and OR to set up powerful search queries.
Go to Projects | Consoles or Financials | Consoles and then select a specific console. (These steps also apply to the Archive Console, accessed under Reports.)
In the View list, select the query that you want to run and then click Execute ![]() . All records are displayed in the grid.
. All records are displayed in the grid.
Note: Most boxes that exist in the related screen appear in the grid for each record.
After the results of the search appear in the console, you can:
Rearrange the left-to-right order of the columns. The column headers support drag-and-drop operations. Another way to rearrange columns is to click the down arrow ![]() next to a column name and select the name of the column that you want to exchange positions with the current column.
next to a column name and select the name of the column that you want to exchange positions with the current column.
Rearrange the top-to-bottom order of the columns. When you click in a column header, to the right side of each column name is a sort indicator arrow that shows the order in which the items in that column are currently listed. Click the sort indicator to reverse the order. An up arrow ![]() indicates that the data is sorted in ascending order (0, 1, 2, A, B, C). A down arrow
indicates that the data is sorted in ascending order (0, 1, 2, A, B, C). A down arrow ![]() indicates that the data is sorted in descending order (C, B, A, 2, 1, 0).
indicates that the data is sorted in descending order (C, B, A, 2, 1, 0).
Drag a column heading to the Group-by pane (the area that displays the text Drag a column header here to group by that column). This puts all entries from the list into groups according to the values in that column. See How to Group Search Results.
Export to Microsoft Excel Worksheets or XML files. See How to Export Contents of a Console.
The number of returned records is displayed in the lower left corner of the screen as Count = ??, where ?? is the number of records.
If you want to drill down into a specific record, click the underlined value that you want to drill into (hyperlink).
Note: For the Archive Console, the hyperlinked column will be Archive File. When you click the hyperlink, the file appears in the related program. For example, if you click “GLTrialBalance.pdf,” the GL Trial Balance report appears in Adobe Reader. If you click “GLTrialBalance.xls,” the GL Trial Balance report appears in Microsoft Excel.
Searches may not be one-time events. They may have to be repeated regularly; for example, monthly. With the Saved Filter feature, you can build and save powerful search filter definitions to repeat complex searches quickly and accurately. These definitions can be private or they can be shared with other users.
Open the console for which you want to create a new filter.
In the Save View ![]() dropdown list, click New View.
dropdown list, click New View.
Note: If you have opened a view that was previously saved and has no pending changes, the Save View dropdown icon looks like this: ![]() .
.
In the New View Properties dialog, specify the properties of the new filter.
In View Name, specify the name of the new filter definition.
If the new filter should be your default view when you open the console, select Default.
To share the filter with other System users, select Shared View.
Click OK.
Use the quick and/or advanced areas of the console to define the filter's search criteria. See How to Complete a Standard Search and How to Complete an Advanced Search.
You can click Execute to review the results of the search.
Click Save View ![]() .
.
Note: Changes to a search filter definition (for example, adding, deleting, or editing query lines) are like the changes that you make to a word processing file; they are only permanent if you click Save View before closing the definition.
Completing a standard search involves specifying operators and values that override the default operators and values selected in the search filters. These custom settings are defined in the console’s filter row.
Click the button to the left of the blank cell underneath a column heading and select the operator that you want to use. Each column in the console includes one or more of the following operators:
|
Equals |
Greater than |
Contains |
|
Does not equal |
Greater than or equal to |
Does not start with |
|
Less than |
Starts with |
Does not contain |
|
Less than or equal to |
Ends with |
Does not end with |
Specify the value that the console should use for the search: word, partial word, letter, number, range of numbers, symbol, and so on.
Notes:
When you press Tab or click the pointer in another filter row box, the System may display the following message: Entering a column filter will clear all advanced filters. The search criteria of the selected search filter always displays as the default query in the console’s Advanced area. If you click OK, the System clears this default search criteria and uses the custom settings that you specify in the filter row.
Repeat step 1 and step 2 for as many console columns as you want. The more operators and values that you define, the more specific your search results will be. If you decide to specify different search values, click Clear ![]() to clear the values in all the data columns.
to clear the values in all the data columns.
Click Execute to run the search.
In addition to their basic search capabilities, consoles include an advanced search feature that lets you build custom searches by using column names from the current search filter, operators, and user-defined values. These advanced searches obtain highly specific search results.
Click Advanced in the lower left corner of the console to open the Advanced area.
The search criteria of the selected view appear as the default query in the Advanced area.
Note: The Advanced area is a slide-out and closes automatically when you move the mouse pointer outside of that area. To have the Advanced area remain open, click Auto Hide ![]() to “pin” the Advanced area in the open position. When you click Auto Hide
to “pin” the Advanced area in the open position. When you click Auto Hide ![]() , the icon changes. To “unpin” the Advanced area, click Auto Hide
, the icon changes. To “unpin” the Advanced area, click Auto Hide ![]() .
.
Change the current search filter query statement or specify a new one. Possible query modifications include the following:
Using the lists available in Column, Operation, and Connect to change a line's column name, operator, or line connector: for example, AND to OR.
Specifying a different search value in Value.
Adding a new line in the blank row under the last line of the current query statement.
Clicking a line and then clicking Move Up ![]() or Move Down
or Move Down ![]() to change the line's order in the query statement.
to change the line's order in the query statement.
Clicking Add Row ![]() to add a blank row under the one where the pointer is currently located. Use this row to create a new query statement line.
to add a blank row under the one where the pointer is currently located. Use this row to create a new query statement line.
Clicking a line and then clicking Remove Row![]() to remove the row from the query statement.
to remove the row from the query statement.
Using Ctrl+click to select two or more query rows, and then clicking Add Group to group these lines together as a compound line. After you do this, parentheses are added around the statement that indicates the group.
To specify a custom query statement for the advanced search, click Clear All ![]() on the console toolbar. This deletes the current query statement. Now you can:
on the console toolbar. This deletes the current query statement. Now you can:
Specify new operators and values in the blank rows of the Advanced area. The System automatically adds the AND connector to a row after you start specifying the details of the next query statement line. You can change this connector to OR.
Specify operators and values in the filter row.
Note: After you specify data in the filter row, if you click the mouse pointer in the Advanced area, the System displays the following message: Entering advanced filters will move all column filters into advanced filters. If you click OK, the System moves the data from the filter row into the Advanced area as a query statement. You can then change this query statement as described earlier.
Click Execute to run the search.
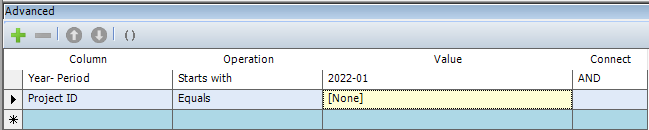
TIP: When filtering data that contains a NULL value, use [None] for the filter value. For example, if you are using the Customer Activity Console and you want to display only invoices that originated in Receivables and that do not impact a Project ID, you would enter a filter where Project ID equals [None], as shown here:
For many search result columns that display numeric information (that is, a column that shows something like the actual hours), the System automatically calculates the totals of all values in these columns and displays these at the bottom of the console (for example, the total of actual hours for the rows listed).
If you group search results, the System automatically calculates and displays group subtotals from these totals. Each group’s subtotals appear, regardless of whether the group’s list of details is open or closed. If the list is open, the group subtotal is displayed at the bottom of the list. The grand total for all groups continues to appear at the bottom of the console.
The following consoles include column totals:
Project Transaction Console
Project Transaction Pending and Billed Console
Project Console
Project Summary Console
Project Budget Console
Project Task Summary Console
Project Task Detail Console
Project Invoice Console
Expenses Console
Resource Scheduling Console
The console returns search results that match one or more search values, for example, projects with a project ID less-than-or-equal-to a specific value. After search results are returned, you can group projects with values in common for easier reviewing by dragging column headers to the Group-by pane. This puts all entries from the list into groups according to the values that are listed underneath that column.
For example, suppose that you are in the Project console and a search returns projects that show the Project Manager names. When you drag the Project Manager column heading to the Group-by pane, the System arranges the projects into this group. You can then view all projects in ascending order. To open each project under the Project Manager, expand the Project Manager. To return this custom view back to the original list form, drag the Project Manager column heading from the Group-by pane back to the list area.
Note: For even more specific project grouping, you can drag more than one column name to the Group-by pane. For example, drag Type and then drag ID to the Group-by pane to group projects first by Type and then by ID within each Type group.
Each console has a default column group and these columns are set for a default width. You can customize these settings – add or remove columns or change their width – by using Manage Columns.
Right-click any of the column headers, and then click Manage Columns ![]() . Manage Columns is displayed.
. Manage Columns is displayed.
Complete the customizations to the console.
To make a column visible on the console, click the column name in the Hidden Columns area and then click Move Right ![]() to move the column to the Visible Columns area.
to move the column to the Visible Columns area.
To hide a currently visible column, click the column name in the Visible Columns area and then click Move Left ![]() to move the column to the Hidden Columns area.
to move the column to the Hidden Columns area.
To change the left-to-right order of the columns on the console, select a column in the Visible Columns area and then click Move Up or Move Down.
To change the default sort order in a column, select a different value from the Sort list. The valid values are as follows: None, Asc, Desc.
If you are sorting by more than one column, you can change the priority of the sorted columns by specifying a number value in Sort Order.
To group by one or more columns, select the Group check box.
To change the default width of a column, enter new value, in pixels, in Width.
To set a column as the "freeze" point on the console, select the Freeze check box. On the console, this column and all columns to the left do not scroll when you use the console's horizontal scroll bar.
If you want to return all settings to the default values, click Defaults.
Click OK.
Note: Many of these actions can be performed by using drag-and-drop or by using the options available from the right-click menu.
You can export the results of a search filter from the console to a Microsoft Excel or .XML file, and then use the exported resource for many purposes.
Select the data to export, and then complete one of the following actions:
Press Ctrl+A to select all data listed.
Click the first row, hold SHIFT, and then click the last row to select a consecutive range of rows.
Click the first row, hold CTRL, and continue to click row to select a nonconsecutive set of rows.
Click Export ![]() on the console toolbar. Or, click the down arrow next to Export, and then click Excel or click XML.
on the console toolbar. Or, click the down arrow next to Export, and then click Excel or click XML.
When the message Would you like to export all rows or only the selected rows? appears, click Selected to export only the data that you selected or click All to export all data columns located by the search.
Complete an export action.
Note: If you are exporting the data to a file, use the Save As dialog box and other navigational controls to open the folder where you want to save the export file. Then, specify the export file name in File name and click Save. The file name cannot contain the following characters: \ / : * ? < > |.
Q: Can I create new data in a console?Q: Can I create new data in a console?
A: No. The consoles are read-only.
A: Yes. Click any value in a console that is highlighted and underlined to drill into the screen where that value was created. After the original data entry screen appears, the data is displayed. In some cases, you can edit pieces of the data. When you save the original data entry screen, and then you return to the console, remember to click Execute ![]() to update the console data to reflect the recent changes.
to update the console data to reflect the recent changes.